From VoIP and SIP to WebRTC
Author: Moeid Heidari
Github: MoeidHeidari (Moeid Heidari) · GitHub
Linkedin: https://www.linkedin.com/in/moeidheidari/

Introduction to SIP
SIP (Session Initiation Protocol) is a signaling protocol established, configures, and terminates the session between two clients on a specific network. SIP has been created to support audio calls, video calls, messaging, presence information, and file transfer between two peers using IP addresses.
SIP is defined in RFC2543 standard as a session initiation protocol. It is published by the IEFT (Internet Engineering Task FORCE) in 1999 and developed to resolve the shortcomings of its predecessor H.323 which was limited by a reliance on centralized call routing information servers, and some aspects were not standardized in general. FRC2543 is superseded by newer versions of the protocol but still remains relevant today because it provides a foundation on which other standards are built.
Differences between VoIP and SIP
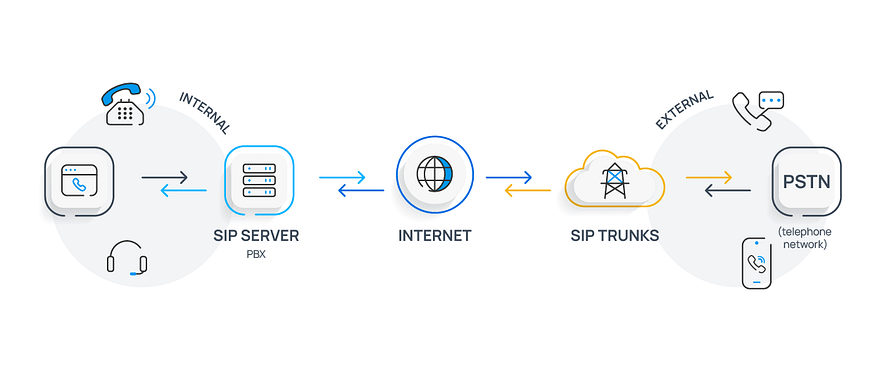
We refer to the type of call that takes place over the internet as VoIP while SIP is the industry standard protocol that enables VoIP communication between two devices. They can be any device and not just IP phones. We can initiate a call between an intercom device and a mobile application as an instance. VoIP relies on data to transmit voice packets rather than the public switched telephone network (PSTN) while SIP enables text and video so that your communication system can be more dynamic, flexible, and interact with other protocols. Most of the SIP trunking providers would offer VoIP service and unified communication as a service (UCaaS) also.
Pros and Cons of VoIP Only
Using VoIP alone is something that can be leveraged to great effect by many businesses. It is a low-cost solution that is easy to implement and use without a long-term commitment.
Pros of VoIP Only
VoIP can be leveraged on its own as a simple, low-cost solution for voice communication. The main benefits include:
- Low cost to get started with continued savings and flat rate billing.
- VoIP systems do not need an on-site installation and are easy to move.
- Long-term contracts are not required for most VoIP providers.
Despite its ease of use, there are some limitations to be taken into consideration when using VoIP by itself.
Cons of VoIP Only
While using only VoIP certainly has its draws, it is often not a robust enough solution for many businesses. Some things you may want to think about:
- VoIP requires sufficient bandwidth to maintain call quality.
- It lacks support for multimedia communications and is limited to only voice.
- It lacks integration with commonly used third-party applications.
Pros and Cons of SIP with VoIP
While using VoIP alone has definite advantages, it can be enhanced by using SIP. You can increase both scalability and versatility with SIP, adding multimedia communications and more. While there are many reasons to leverage SIP, like using VoIP alone there are also drawbacks.
Pros of SIP Trunking
There are many advantages to using SIP for your business. While using VoIP alone has its advantages, the flexibility of SIP makes it a great choice for many companies.
- Very scalable, SIP is not only limited to voice so you can expand into video, messaging, and more.
- Frequently has built-in integration with commonly used software for increased productivity.
- Can be integrated with PRI lines for a combination phone system that best suits your business.
- Very flexible with pricing by allowing for additional features and lines as needed.
Cons of SIP Trunking
While the versatility and cost savings of SIP make it a great solution, like using VoIP alone, it is not without its drawbacks.
- Requires sufficient bandwidth to maintain service quality.
- Not all SIP providers offer the same features or quality of service, so you will need to make sure you are choosing the right one for your business.
- SIP can have issues with both quality and security if used on the public internet.
SIP server
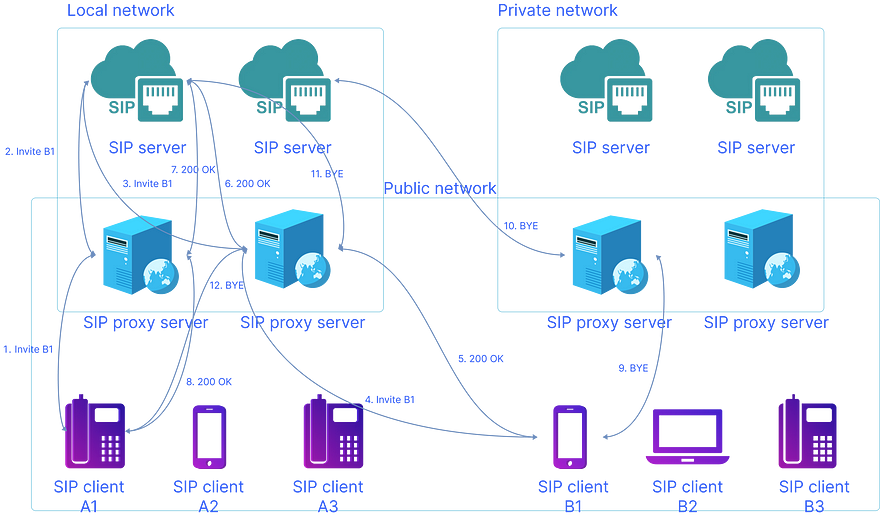
One of the most prominent parts of a PBX(Private Branch Exchange) system is the SIP server that handles the protocol and all SIP calls routing in the local or public network. SIP servers are designed to make communication possible between two or more endpoints regardless of their location. SIP servers can respond to any create, modify, or terminate telephone call requests from other types of devices on a network. Examples of a SIP server are as follow:
- Call signaling (Dialing)
- Call setup
- Managing user authorization & authentication

Most of the time you would like to set up the SIP server inside the local network of the organization rather than making it publicly accessible. In such a scenario most probably you want to have a call from your client standing outside of the network accordingly. There is an approach for such a purpose which is establishing a SIP proxy server in the organization’s internal network, or it can be hosted by a third-party carrier also. Additionally you can find a cloud-based service that offers hosted VoIP solutions In general, there are two main types of SIP Proxy Server (SPS)
- Stateless SIP Proxy server
A proxy that does not save any of the call information. it means there are no records that would typically be kept to troubleshoot and manage the connections. A kind of proxy that just routs the packets.
- Stateful SIP Proxy Server
A proxy that stores all of the information related to each call or connection. Thus if there are any problems with your connection, you can go through the logs of the call and start troubleshooting. Also, if one SIP user agent drops out, it can re-establish the connection with the other endpoint without having to initiate a new session. This saves bandwidth for both parties as well as time as there are no delays when setting up new connections. The downside is that stateful SIP proxies have more overhead than stateless ones and are also more expensive because they need more resources to store data.
WebRTC to SIP and vice versa

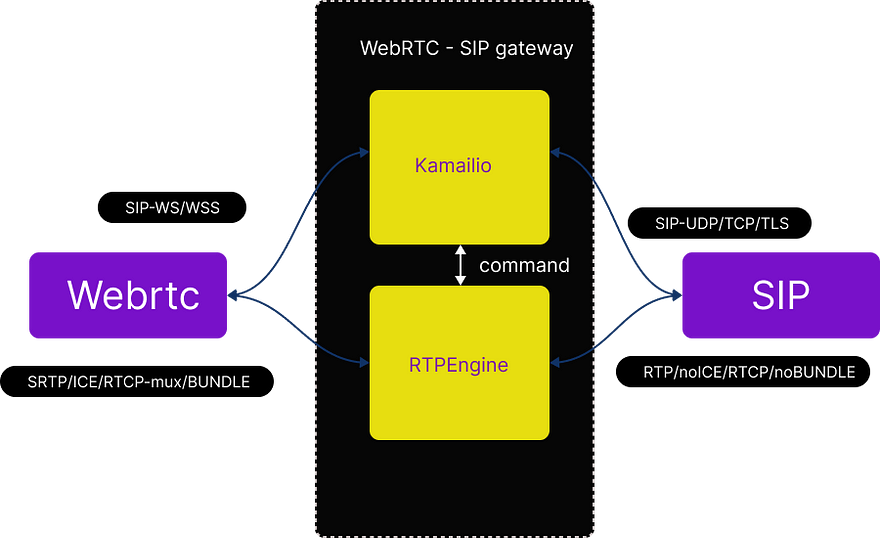
In this article, we want to go through a solution to make a WebRTC call between a WebRTC client and a legacy SIP client. To do so we need to set up Kamailio, RTPEngine, and a TURN server. The configuration is IPv6 enabled by default and it will bridge SRTP to RTP and ICE to nonICE. You can find a Javascript Webrtc client here.
Regardless of the Linux distribution, we need to install the following tools:
- Kamailio
- RTPEninge
- Nginx (Proxy + WebRTC client)
- Coturn
Setup Kamailio on Ubuntu 20.04/18.04/16.04
- MariaDB, The first dependency before installing Kamailio to install is either MariaDB or Mysql. So we need to install one of these databases first.
sudo apt update

sudo apt install mariadb-server- Kamailio repository, With the following command you can
wget -O- http://deb.kamailio.org/kamailiodebkey.gpg | sudo apt-key add -Then add the repository lines to your /etc/apt/sources.list file depending on the Kamailio version of your choice
For Ubuntu 20.04
sudo tee /etc/apt/sources.list.d/kamailio.list<<EOFdeb http://deb.kamailio.org/kamailio55 focal maindeb-src http://deb.kamailio.org/kamailio55 focal mainEOFFor Ubuntu 18.04
sudo tee /etc/apt/sources.list.d/kamailio.list<<EOFdeb http://deb.kamailio.org/kamailio55 bionic maindeb-src http://deb.kamailio.org/kamailio55 bionic mainEOFFor Ubuntu 16.04
sudo tee /etc/apt/sources.list.d/kamailio.list<<EOFdeb http://deb.kamailio.org/kamailio55 xenial maindeb-src http://deb.kamailio.org/kamailio55 xenial mainEOF- Install Kamailio on Ubuntu 20.04|18.04|16.04
Once the repository has been configured, update your system and install Kamailio. You’ll also install Kamailio MySQL modules:
sudo apt updatesudo apt install kamailio kamailio-mysql-modulessudo apt install kamailio-websocket-modules kamailio-tls-modules
Configure Kamailio on Ubuntu 20.04|18.04|16.04
Edit the file /etc/kamailio/kamctlrc and make sure the DBENGINE variable is set to MySQL. Remove the # symbol to uncomment it.
Set Database engine to MYSQL
$ sudo vim /etc/kamailio/kamctlrcDBENGINE=MYSQLDBHOST=localhostNext is to create a database for Mysql. The command below will create users and tables needed by Kamailio( Schema)
$ sudo kamdbctl createMySQL password for root: INFO: creating database kamailio ...INFO: granting privileges to database kamailio ...INFO: creating standard tables into kamailio ...INFO: Core Kamailio tables succesfully created.Install presence related tables? (y/n): yINFO: creating presence tables into kamailio ...INFO: Presence tables succesfully created.Install tables for imc cpl siptrace domainpolicy carrierroutedrouting userblacklist htable purple uac pipelimit mtree sca mohqueuertpproxy rtpengine? (y/n): yINFO: creating extra tables into kamailio ...INFO: Extra tables succesfully created.Install tables for uid_auth_db uid_avp_db uid_domain uid_gflagsuid_uri_db? (y/n): yINFO: creating uid tables into kamailio ...INFO: UID tables succesfully created.You will be prompted to provide a MySQL root password. Mysql users and passwords added by the above command are.
- kamailio with the password
kamailiorw. It has read/write access permissions to the Kamailio database. - kamailioro: The password for this user is
kamailioro. It has read-only access permissions to the Kamailio database.
The /etc/kamailio/kamailio.cfg is the configuration file for Kamailio. Edit it to enable some of the features shipped with it.
You can also set your SIP domain:
$ sudo vim /etc/kamailio/kamctlrc## your SIP domainSIP_DOMAIN=computingforgeeks.comIf you don't have a working DNS server on your local network, you can as well use an IP Address in place of a domain name.
Add the following lines just below #!KAMAILIO.
$ sudo vim /etc/kamailio/kamailio.cfg#!define WITH_MYSQL#!define WITH_AUTH#!define WITH_USRLOCDB#!define WITH_ACCDBThese directives will turn on necessary modules. E.g when you specify,WITH_MYSQL it enables the loading of mysql.so:
#!ifdef WITH_MYSQLloadmodule "db_mysql.so"#!endifThen restart the Kamailio service:
sudo systemctl restart kamailioIf you encounter any issues with Kamailio service, the logs are available on: /var/log/kamailio.log
Certificates
The next step is to make the Certificates. To do so we can use a solution like Let’s Encrypt. Then we can use the same certificate for Kamailio TLS, Nginx TLS, and TURN TLS.
apt-get install certbot

certbot certonly --standalone -d YOUR-DOMAIN
You will then find the certificates under:
/etc/letsencrypt/live/YOUR-DOMAIN/privkey.pem

/etc/letsencrypt/live/YOUR-DOMAIN/fullchain.pem
Get configuration files
All files needed to setup all components on Debian 9 Stretch.
git clone [GitHub - havfo/WEBRTC-to-SIP: Setup for a WEBRTC client and Kamailio server to call SIP clients](https://github.com/havfo/WEBRTC-to-SIP.git)

cd WEBRTC-to-SIP

find . -type f -print0 | xargs -0 sed -i 's/XXXXXX-XXXXXX/PUT-IPV6-OF-YOUR-SIP-SERVER-HERE/g'

find . -type f -print0 | xargs -0 sed -i 's/XXXXX-XXXXX/PUT-IPV4-OF-YOUR-SIP-SERVER-HERE/g'

find . -type f -print0 | xargs -0 sed -i 's/XXXX-XXXX/PUT-DOMAIN-OF-YOUR-SIP-SERVER-HERE/g'
Install RTPEngine
This will do the SRTP-RTP bridging needed to make WebRTC clients talk to legacy SIP servers/clients. You can find the latest build instructions in their readme.
The easiest way of installing is to get it from the Sipwise repository:
echo 'deb [Index of /spce/mr9.4.1](https://deb.sipwise.com/spce/mr9.4.1/) buster main' > /etc/apt/sources.list.d/sipwise.list

echo 'deb-src [Index of /spce/mr9.4.1](https://deb.sipwise.com/spce/mr9.4.1/) buster main' >> /etc/apt/sources.list.d/sipwise.list

wget -q -O - https://deb.sipwise.com/spce/keyring/sipwise-keyring-bootstrap.gpg | apt-key add -

apt-get update

apt-get install -y ngcp-keyring ngcp-rtpengine
After you have successfully installed RTPEngine, copy the configuration from this repository.
cd WEBRTC-to-SIP

cp etc/default/ngcp-rtpengine-daemon /etc/default/

cp etc/rtpengine/rtpengine.conf /etc/rtpengine/

/etc/init.d/ngcp-rtpengine-daemon restart
Install IPTables firewall (optional)
RTPEngine handles the chain for itself, but makes sure to not block the RTP ports it is using. Take a look in iptables.sh for details, and apply it by doing the following. This will persist after the reboot. You can run the iptables.sh script at any time after it is set up.
cd WEBRTC-to-SIP

chmod +x iptables.sh

cp etc/network/if-up.d/iptables /etc/network/if-up.d/

chmod +x /etc/network/if-up.d/iptables

touch /etc/iptables/firewall.conf

touch /etc/iptables/firewall6.conf

./iptables.sh
Install WebRTC client
This will install the client that can be found here.
To be able to support running HTTP(S) and TURN on the same port (443), we need a newer version of Nginx that supports streams the way we need. Get it from the official repo:
echo 'deb [Index of /packages/mainline/debian/](http://nginx.org/packages/mainline/debian/) buster nginx' > /etc/apt/sources.list.d/nginx.list

curl -fsSL https://nginx.org/keys/nginx_signing.key | apt-key add -

apt-get update

apt-get install nginx

cd WEBRTC-to-SIP

cp etc/nginx/nginx.conf /etc/nginx/

cp etc/nginx/conf.d/default.conf /etc/nginx/conf.d/

cp -r client/* /var/www/html/

service nginx restart
Install TURN server
apt-get install coturn

cp etc/default/coturn /etc/default/

cp etc/turnserver.conf /etc/

service coturn restart
You should now be able to go to https://XXXX-XXXX/ and call legacy SIP clients. Click the account icon in the top right corner and add the following settings:
- Display name: Whatever
- SIP URI: websip@XXXX-XXXX
- Password: websip
- Outbound Proxy: wss://XXXX-XXXX/ws
To manually configure other TURN servers, change the config in client/config.js.