
Mastering Crossview Deployment: Securing Your Crossplane Dashboard in an Enterprise Kubernetes Environment
Imagine this: Your DevOps team is juggling multi-cluster setups, monitoring compositions and claims in real-time, all while ensuring compliance with enterprise-grade security. Crossview makes this a reality, but deploying it isn’t a one-size-fits-all affair. Authentication modes are the secret sauce here, balancing usability with ironclad security. In this comprehensive guide, we’ll dive deep into deploying Crossview on Kubernetes using Helm, tailored for enterprise environments. We’ll explore each auth mode.Session (including local and SSO via OIDC/SAML), Header, and None — complete with step-by-step instructions, best practices, and real-world scenarios. By the end, you’ll have the tools to roll out a production-ready dashboard that scales with your organization.
Whether you’re a Kubernetes veteran or just dipping your toes into Crossplane, buckle up.This isn’t your average tutorial. We’ll weave in tips from the trenches, potential pitfalls, and even a dash of humor to keep things engaging. Let’s transform your Crossplane workflow from chaotic to cinematic.
Why Crossview? A Quick Primer for Enterprises
Before we helm our way into deployment, let’s set the stage. Crossview isn’t just another dashboard; it’s the missing link for Crossplane users. Built by the folks at Corpobit, it offers:
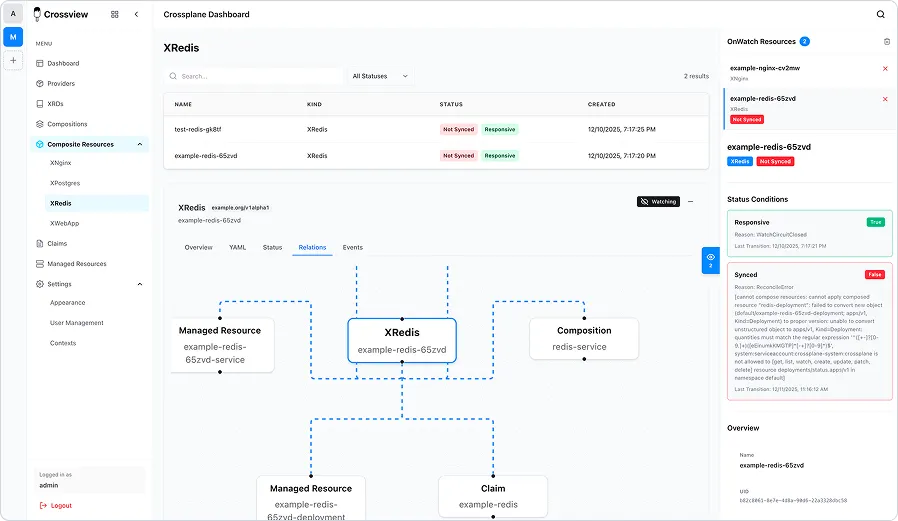
- Multi-Cluster Mastery: Kubernetes Informers and WebSocket-driven updates mean no more frantic refreshes. Watch resources evolve like a live sports ticker.
- Real-Time Magic: Seamlessly switch contexts without leaving the UI.Perfect for federated environments.
- Visual Storytelling: See resource hierarchies, statuses, events, and conditions in a Chakra UI-powered interface that’s as intuitive as it is beautiful (dark mode included for those late-night ops sessions).
- Backend Brilliance: A Go + Gin server handles the heavy lifting, serving APIs and static assets with minimal overhead.
- Auth Flexibility: From session-based local logins with SSO options to lightweight headers or no auth at all, it adapts to your security posture.
For enterprises, Crossview means reduced toil, faster troubleshooting, and better collaboration. But deployment in a production Kubernetes cluster demands attention to detail: high availability, secret management, RBAC, and integration with existing identity providers. Helm is our weapon of choice here.It’s declarative, repeatable, and enterprise-friendly. We’ll assume you have a Kubernetes cluster (v1.20+), Helm 3 installed, and Crossplane running (if not, check Crossplane’s docs first).
Prerequisites Checklist:
- A running Kubernetes cluster with admin access.
- Helm 3.x installed on your local machine.
- PostgreSQL database (either external or provisioned via Helm subchart; required for Session mode).
- Crossplane installed in your cluster(s).
- Basic familiarity with YAML and env vars.
- For SSO: An identity provider like Keycloak, Okta, or Azure AD.
Pro Tip: Always deploy in a dedicated namespace like crossview to isolate resources. And remember, Crossview uses your pod’s service account for Kubernetes API access — tune RBAC accordingly. Configuration priority: Env vars (e.g., AUTH_MODE) > Config file (config/config.yaml) > Defaults.
Base Deployment: Setting Up Crossview with Helm
Helm charts are the Kubernetes equivalent of a well-packed suitcase: everything you need, neatly organized. Crossview’s chart is hosted on GitHub Pages, making it easy to add and install.
Step 1: Add the Repo
Fire up your terminal and add the Crossview Helm repository:
helm repo add crossview https://corpobit.github.io/crossview
helm repo update
This pulls in the latest chart versions. As of February 2026, we’re on a stable release, but always check for updates.
Step 2: Prepare Secrets
Security first! Crossview requires a PostgreSQL DB for Session auth. Generate strong secrets:
export DB_PASSWORD=$(openssl rand -base64 32)
export SESSION_SECRET=$(openssl rand -base64 32)
In enterprises, use tools like Sealed Secrets or External Secrets Operator to manage these — don’t hardcode them!
Step 3: Basic Install
For a quick start, install with defaults (Session auth):
helm install crossview crossview/crossview \
  --namespace crossview \
  --create-namespace \
  --set secrets.dbPassword=$DB_PASSWORD \
  --set secrets.sessionSecret=$SESSION_SECRET
This deploys:
- A Deployment for the Crossview pod.
- A Service (ClusterIP by default).
- Optional PostgreSQL subchart if enabled.
- ConfigMap for app settings.
Access it via port-forwarding:
kubectl port-forward svc/crossview 3001:3001 -n crossviewOpen http://localhost:3001 in your browser. For Session auth, use the login form or SSO if configured.
Customization via Values.yaml
For enterprise tweaks, create a values.yaml file. Here’s a skeleton:
replicaCount: 3  # For HA
ingress:
  enabled: true
  className: nginx  # Or your Ingress controller
  hosts:
    - host: crossview.yourdomain.com
      paths:
        - path: /
          pathType: ImplementationSpecific
config:
  server:
    auth:
      mode: session  # Override per mode: session, header, none
db:
  host: crossview-postgres
  port: 5432
  name: crossview
  user: postgres
postgres:
  enabled: true  # Provision DB via subchart
  auth:
    postgresPassword: ""  # Set via --set or external
secrets:
  dbPassword: ""  # Inject via --set
  sessionSecret: ""  # Same
serviceAccount:
  create: true
  annotations: {}  # Add IAM roles if on AWS/GCP
Install with:
helm install crossview crossview/crossview \
  --namespace crossview \
  --create-namespace \
  -f values.yaml \
  --set secrets.dbPassword=$DB_PASSWORD \
  --set secrets.sessionSecret=$SESSION_SECRET
Now, let’s dive into auth modes. Each section includes config examples, pros/cons, and enterprise tips. Full details in repo docs like docs/CONFIGURATION.md, docs/SSO_SETUP.md, and docs/SSO_PROTOCOLS.md.
Auth Mode 1: Session — The Versatile Default with Local and SSO Support
Session mode is the go-to for most setups: It handles username/password logins, stores identity in encrypted sessions, and integrates SSO for hybrid auth. Requires a DB for session storage.
Why Choose It?
- Flexible: Local form-based login plus optional SSO (OIDC/SAML).
- Secure session management with encryption.
- Cons: Needs DB; more overhead than Header/None.
Configuration
In values.yaml (or env AUTH_MODE=session):
config:
  server:
    auth:
      mode: session
  session:
    secret: ""  # Set via secrets.sessionSecret
    maxAge: 86400000  # 24h in ms
    secure: false  # True for HTTPS
    httpOnly: true
For SSO (OIDC/SAML), add:
config:
  sso:
    enabled: true
    oidc:  # Or saml
      enabled: true
      issuer: https://keycloak.yourdomain.com/realms/crossview
      clientId: crossview-client
      clientSecret: ""  # Via secrets.oidcClientSecret
      callbackURL: https://crossview.yourdomain.com/api/auth/oidc/callback
      scope: openid profile email
      usernameAttribute: preferred_username
      emailAttribute: email
      firstNameAttribute: given_name
      lastNameAttribute: family_name
Add secrets to Helm install
--set secrets.oidcClientSecret=$OIDC_SECRETPost-install, for local users: Use DB to add (e.g., via psql) or API endpoints like /api/auth/login.
For SSO setup: Configure your IDP (e.g., Keycloak) with client, redirect URI as callbackURL. First SSO login creates an admin user; others are regular.
Enterprise Best Practices
- Enforce MFA via IDP for SSO.
- Rotate SESSION_SECRET quarterly.
- Scenario: A large org uses Session with Okta OIDC for 1000+ users, falling back to local for air-gapped testing.
- Tip: Debug sessions with /api/auth/check.
Pitfall: Without sso.enabled, only local login; DB required enable HA Postgres.
Auth Mode 2: Header — Proxy-Trusted for Internal Proxies
Header mode offloads auth to an upstream proxy (e.g., OAuth2 Proxy, Nginx), trusting a header for identity. No login form, no DB needed.
Why Choose It?
- Flexible: Local form-based login plus optional SSO (OIDC/SAML).
- Secure session management with encryption.
- Cons: Needs DB; more overhead than Header/None.
Configuration
In values.yaml (or env AUTH_MODE=session):
config:
  server:
    auth:
      mode: session
  session:
    secret: ""  # Set via secrets.sessionSecret
    maxAge: 86400000  # 24h in ms
    secure: false  # True for HTTPS
    httpOnly: true
Proxy example: Set header after auth, e.g., in Nginx: proxy_set_header X-Auth-User $remote_user;.
Enterprise Best Practices
- Combine with Istio mTLS or NetworkPolicies.
- Rotate proxy secrets via CI/CD.
- Scenario: Internal tools team uses Header with AWS ALB auth, injecting user from Cognito.
- Tip: If createUsers=true and DB enabled, headers create persistent users.
Pitfall: Misconfigured proxy exposes app test with curl -H “X-Auth-User: test”.
Auth Mode 3: None — Open Access for Dev Environments
None mode disables auth entirely: All requests are anonymous. No DB, no logins.
Why Choose It?
- Simplest for prototyping or trusted networks.
- Zero config overhead.
- Cons: Insecure for production, exposes everything.
Configuration
In values.yaml (or env AUTH_MODE=none):
config:
  server:
    auth:
      mode: none
postgres:
  enabled: false
Enterprise Best Practices
- Use only in isolated dev clusters, behind firewalls/VPN.
- Monitor logs for unauthorized access.
- Scenario: Hackathon or local dev where speed > security.
- Tip: Quick toggle for testing APIs without creds.
Pitfall: Accidental prod deploy, double-check mode; add TLS anyway.
Advanced Enterprise Topics: Scaling and Securing Your Deployment
Now that auth is sorted, let’s level up.
High Availability
- Set replicaCount: 3+ for redundancy.
- Use Horizontal Pod Autoscaler:
autoscaling:
  enabled: true
  minReplicas: 2
  maxReplicas: 10
targetCPUUtilizationPercentage: 80- Tune Ingress for WebSockets (e.g., proxy timeouts).
Security Hardening
- TLS on Ingress.
- Secret management with Vault.
- RBAC: Bind service account to Crossplane viewer roles.
- Monitoring: Prometheus annotations.
Multi-Cluster Setup
Mount kubeconfigs as secrets for federated access.
Common Pitfalls and Fixes
- Mode Mismatch: Ensure AUTH_MODE env aligns with config.
- SSO Redirects: CallbackURL must match Ingress host.
- DB Issues: For external Postgres, override db.host/port.
- User Sync: In Session+SSO, attributes map from IDP.
Crossview’s auth modes make it adaptable — from open dev to zero-trust enterprise. Dive into the repo for more; deploy and elevate your Crossplane game!